Drilling and Routing Cable Through Open Framing
Pre-wiring a job site for low voltage differs from 110/220 electrical in the aspect that we cannot interfere with their system, but they can interfere with or affect ours. It is most common for all other trades to have their wiring, plumbing, and HVAC mostly completed before the low-volt installer walks onto the job site. This has benefits and negatives for the low-volt installer.
The benefits are you can see what goes where and lay out your paths to avoid power or being in the way for other trades. The HVAC installer does not care how much inconvenience it is for you to move your wire because their duct MUST go through a bay where you have wires. You will be the one to move. The electrician has no concern when they route a 220VAC wire parallel to your camera wires for 20 feet. Having the other trades mostly done gives you the ability to install with increased confidence your paths are good for you and others.
The negatives are, there is often no easy path(s) left for your wires. You have to get creative and be cautious when drilling to avoid hitting someone else's work. The best time to start your pre-wire is when the electricians are about 1/2 way into their job. They have their paths established and usually, the other trades are done.
Here is the typical order that trades are on a job site for open framing work.
Plumbing for Water / Sewer / Sprinkler
HVAC
Electricians
Low-Volt
Insulation
SheetRock
This order is generally the preferred order to keep trades from being in each other's way, but there are times you will find multiple trades in the middle of work at the same time. If you find yourself on a job site where there are several trades routing their materials through open framing at the same time, be nice! If you see your path might be in someone else's path, ask them. It is easier to move your path before you have your wires secured. Working with other trades will save you time in the long run.
If you are starting your wiring before other trades are finished, you need to be aware of spaces and paths that may be needed for them. If you see a bunch of empty holes, do not assume you can run your wires through them. It is very common for electricians, plumbers, and HVAC installers to pre-drill an entire site days before they start pulling wire or installing pipes and ductwork. Take the time to think about what you are doing and how it may affect someone else.
Horizontal Drilling Paths
Horizontal paths through walls can be the most time-consuming due to the amount of drilling. Sometimes you have no choice and will need to drill paths through multiple bays. The graphic below shows the areas to avoid. The ends of studs are not good because it affects the integrity of the stud and within a few inches of the end, you increase the risk of hitting nails.
The switch zone (middle) is too busy with wires and electrical boxes. The outlet zone is also busy and lower will be to close the end of the stud.
Horizontal drilling also includes areas through floor joists and areas between floors. See Drilling through beams and joists for more information.

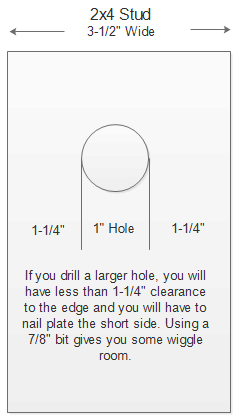
The size of the hole you drill needs to be selected with care. Drill too small a hole and your cables become hard to pull through, which takes more time. Too large a hole removes more material than necessary for the task and can lead to requiring nail plating and weakened framing. Never be afraid to drill a hole larger than you think you may need, just use common sense as to how large you go. Plan out what cables you need to pull through and make a sample bundle. Measure the diameter of the bundle then add 50% to that. (bundle diameter x 1.5) . Per NEC you must leave a 1-1/4" distance from the edge of the hole to the face of the framing member. This includes those thin gauge steel joists.
When drilling through 2x4 studs, using a 7/8" bit is very common because IF drilled in the middle of the stud, it leaves more than the 1-1/4" minimum clearance. 1" is the maximum hole size allowed without nail plating at least on one side of the stud. When you consider you will almost never hit the exact center of the stud and drill a perfectly perpendicular hole, use a 7/8" bit if you can.


Verticle Drilling
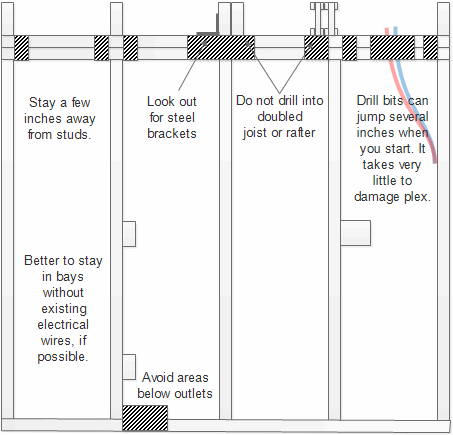
Before drilling up through the top of a wall, LOOK!!! Don't just take a quick look. Get a ladder and LOOK!!! You will be amazed how many times you think there is nothing up there you do not want to hit. Visually account for every wire and pipe in the area you are drilling. If there is an electrical wire in your way. Bend it over so you have room, or move to another bay. The drawing below shows those areas to avoid for structural and safe concerns.

Walls can become very crowded with pipes, wires, and HVAC. Finding clear paths into a bay can be challenging and not always give you optimal choices. For communication circuits, avoiding long parallel runs with house voltage is the highest priority. Even when using twisted wire, which reduces AC inductance issues, parallel runs can cause unwanted interference. These problems can be difficult to solve and the best way to avoid potential problems is to keep away from electrical wires. You can cross electrical wires at 90 degrees, even touching them, but parallel runs over a few feet need to be avoided.
The NEC does not forbid running house electrical wires in a stud bay next to, even touching, low-voltage wires. As long as one or both are jacketed in a metallic or non-metallic shieth, NEC 760.136 (G). The reason for the desired separation is to minimize the chance of interference between systems.

With experience, you will be able to see clear and proper paths as you drill and pull wire. Often it can be as simple as which side of a bay you route your wire. In the image below notice the red firewire. It was routed up from below, across the bottom plate (sole), and up the next stud. NEVER route wires on or within a few inches of a bottom or top plate. If someone, maybe you, drills up from below without checking their path, they risk hitting your wires.
In this case, it would have been better to run up a few feet and then cross over to the other stud.

* NEC 760.136 (G) states that a 2" separation from power is required unless certain conditions are met. One of those conditions is if the power or FPLR wire is in a raceway, metal-sheathed, metal-clad, nonmetallic-sheathed, or type UF cable. Romex is nonmetallic-sheathed. In reality, the only electrical wire not in the above list that you may come across is knob and tube wiring.
For communication and signaling circuits, NEC 800.133(A)(2) makes a similar allowance.